
Garlic Parmesan Cheeseburger Bombs
Garlic Parmesan Cheeseburger Bombs are like little pockets of pure yum, filled with juicy cheeseburger goodness, zesty garlic, and a sprinkle of Parmesan that adds just the right kick. These…
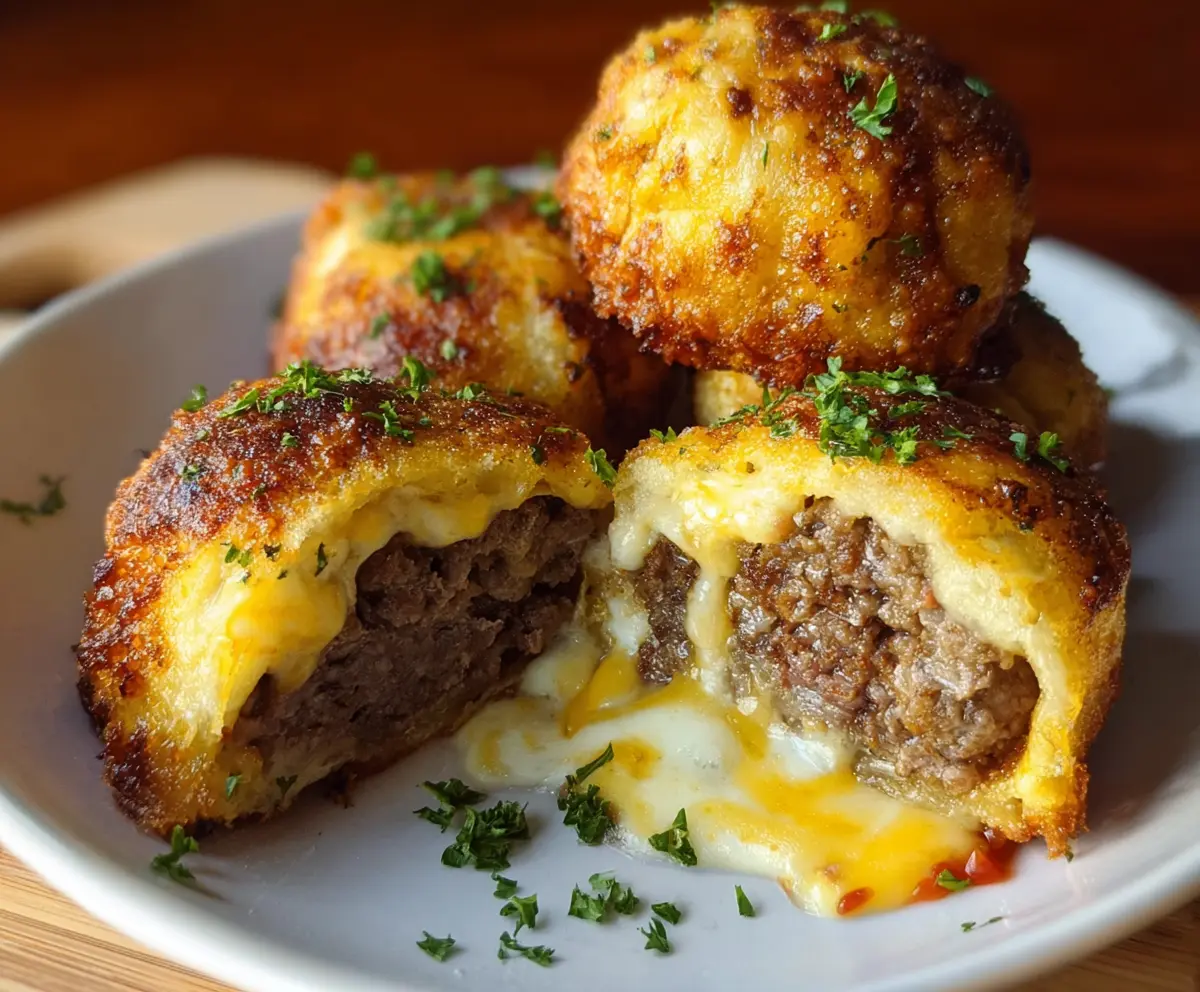
Tip: save now, cook later.Garlic Parmesan Cheeseburger Bombs are like little pockets of pure yum, filled with juicy cheeseburger goodness, zesty garlic, and a sprinkle of Parmesan that adds just the right kick. These bite-sized treats have a crispy outside and a melty, cheesy center that’s hard to resist.
I love making these when friends come over because they’re so easy to pop in your mouth while chatting or watching the game. The garlic and Parmesan give them a rich, tasty twist that makes everyone ask for the recipe, and honestly, it’s a fun way to mix up your usual burger night.
My favorite way to serve these is with a side of simple dipping sauces like ketchup or ranch, but they’re just as amazing on their own. They make a great snack or appetizer, and I always find myself sneaking a few extra before anyone else can snag them!
Key Ingredients & Substitutions
Ground beef: Using 80% lean beef keeps the filling juicy and flavorful without too much grease. If you want a healthier option, try ground turkey or chicken, but keep the seasoning bold.
Mozzarella cheese: Cubed mozzarella inside gives a gooey center. For the outer layer, shredded mozzarella mixed with Parmesan creates a crispy crust. If mozzarella isn’t available, provolone or Monterey Jack work well.
Parmesan cheese: Adds sharp, nutty flavor and helps crisping. Use Pecorino Romano if you like a saltier bite or finely grated Asiago as another tasty option.
Panko breadcrumbs: They provide extra crunch for the coating. If you don’t have panko, regular breadcrumbs work but won’t be as crispy.
Garlic and parsley: Minced garlic in the breadcrumb mix and butter drizzle enhances flavor and freshness. Dried parsley can be used if fresh isn’t handy, but it won’t be as vibrant.
How Do You Get That Perfect Crispy, Cheesy Outer Crust?
The secret is layering and pressing the shredded mozzarella and Parmesan cheese firmly around the breadcrumb-coated meatball. This creates a thick cheese crust that crisps up beautifully when fried.
- After breading the meatballs, press the shredded cheese mixture firmly on all sides. Hands work best here to mold the cheese tightly.
- Make sure your oil is hot enough (350°F/175°C) before frying; too low and the cheese won’t crisp properly, too hot and the outside burns before the inside cooks.
- Turn often while frying to brown all sides evenly and melt the cheese crust thoroughly.
A tip I like: use fresh mozzarella for melting but make sure it’s well-drained to avoid sogginess. Also, adding garlic to the breadcrumb mix and butter brush at the end boosts flavor and makes your bombs smell amazing!
Equipment You’ll Need
- Deep frying pan or pot – deep enough for frying and helps cook the bombs evenly.
- Cooking thermometer – to keep oil at 350°F for perfect crispiness and safety.
- Mixing bowls – for combining ingredients and setting up breading stations.
- Slotted spoon – easy for lifting bombs out of hot oil and draining excess oil.
- Measuring cups and spoons – for accurate ingredient amounts to get great flavor every time.
Flavor Variations & Add-Ins
- Swap ground beef for ground turkey or chicken for a lighter version that still tastes great.
- Add chopped cooked bacon inside for smoky crunch and richer burger flavor.
- Stir in diced jalapeños in the meat for a spicy kick that wakes up the cheese.
- Try different cheeses like pepper jack or smoked gouda inside for a fun twist on the melty center.
Equipment You’ll Need
- Deep frying pan or pot – for frying the bombs evenly and safely.
- Cooking thermometer – to monitor and keep the oil at the right temperature (350°F or 175°C).
- Mixing bowls – for preparing the filling, breading stations, and cheese coating.
- Slotted spoon – for safely removing the bombs from hot oil and draining excess oil.
- Measuring cups and spoons – to measure ingredients accurately.
- Paper towels – for draining the fried bombs after cooking.
Flavor Variations & Add-Ins
- Protein swaps: Use ground turkey, chicken, or even sausage to change up the flavor and texture.
- Spicy twist: Add chopped jalapeños or a dash of cayenne pepper to the beef mixture for extra heat.
- Bacon boost: Mix in cooked, crumbled bacon for a smoky, savory kick.
- Cheese variations: Try pepper jack, smoked gouda, or provolone inside in place of mozzarella for new flavors.
- Herb and seasoning tweaks: Add fresh chopped basil, oregano, or smoked paprika to the breadcrumb coating for extra aroma and taste.
Can I Use Frozen Ground Beef for This Recipe?
Yes, but make sure to fully thaw it before use. Thaw overnight in the fridge or use the defrost setting on your microwave. This helps the beef mix evenly and cook properly inside the bombs.
Can I Bake Instead of Frying the Cheeseburger Bombs?
Absolutely! Preheat your oven to 400°F (200°C) and bake the bombs on a parchment-lined tray for about 20-25 minutes or until the cheese crust is golden and crispy, flipping halfway through for even browning.
How Should I Store Leftovers?
Store any leftovers in an airtight container in the fridge for up to 3 days. Reheat them in the oven or air fryer to keep the crust crispy, rather than the microwave, which can make them soggy.
Can I Prepare These Ahead of Time?
Yes! Assemble the cheeseburger balls and coat them with cheese, then freeze on a baking sheet. Once frozen, transfer to a freezer bag. Fry or bake straight from frozen, adding a few extra minutes to the cooking time.