

Christmas Tree Brownie Pops with Green Chocolate
The first green-coated tree always looks a little plain until the yellow star goes on; that tiny topper makes the shape read instantly. These Christmas Tree Brownie Pops start with…
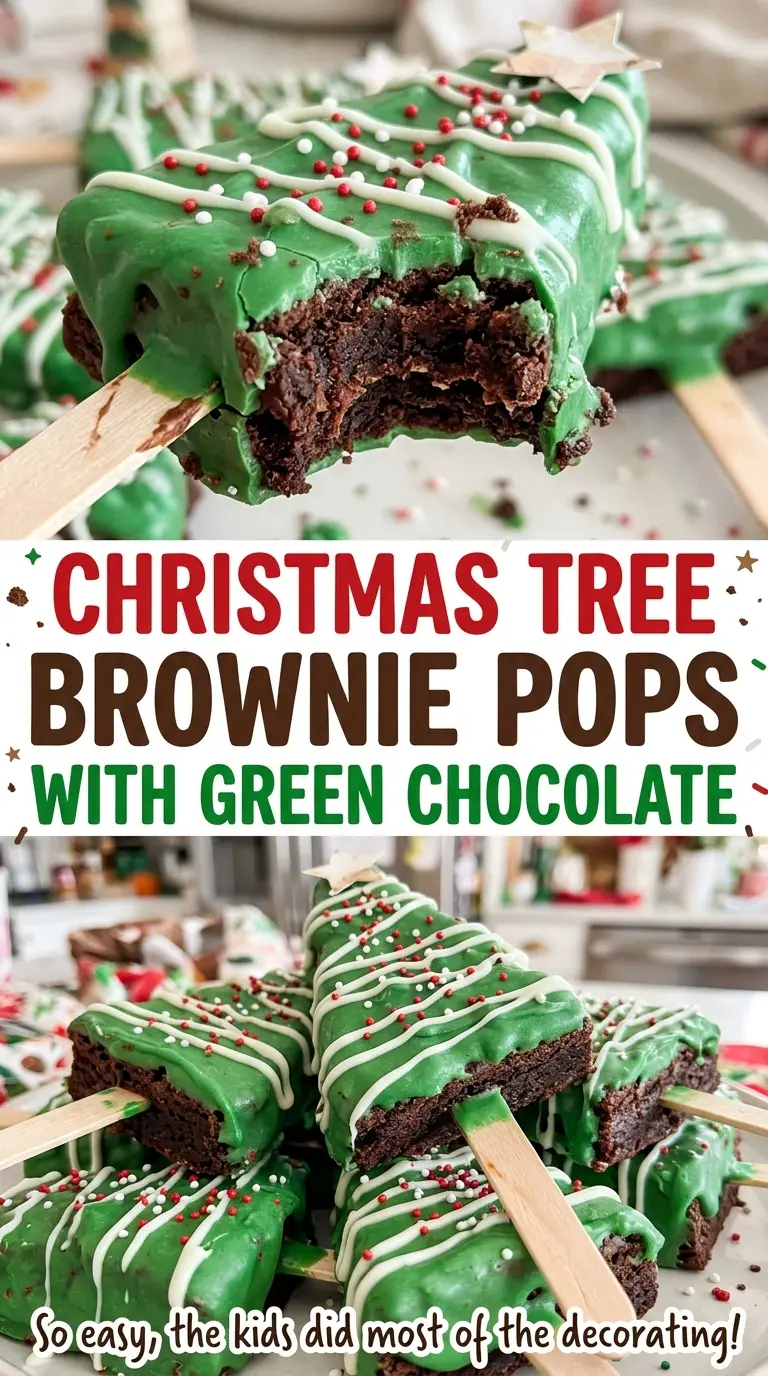
Tip: save now, cook later.The first green-coated tree always looks a little plain until the yellow star goes on; that tiny topper makes the shape read instantly. These Christmas Tree Brownie Pops start with a pan of rich, chocolatey brownies, cut into trees and finished with a smooth green candy shell and holiday sprinkles. I like that each pop has a soft brownie center under the crisp coating, and the paper sticks make them easy to pick up without smudging the decorations.
The brownie needs to be sturdy enough to hold its shape, but it shouldn’t bake up dry. I pull the pan when a toothpick near the center comes out with a few moist crumbs, then let the brownies cool completely before chilling them until firm. That gives the cutter a clean path through the slab and makes it much easier to add the sticks. Once the coating is on, the stars and sprinkles turn each brownie into a little edible tree.

Kitchen Note
Dip the end of each stick in coating before pushing it into a brownie tree, then give the pops their full 10 minutes in the refrigerator. That little coating “glue” sets around the stick and helps keep the trees attached while you dip them.
Save these Christmas Tree Brownie Pops for a festive dessert with fudgy centers, green candy coating, and a star on every tree.
Why Chilling the Brownies Makes Cleaner Christmas Trees
A warm brownie slab can taste perfect and still be a mess to cut. The tree-shaped cutter has narrow points and little corners where soft crumbs catch, so the brownie can tear instead of releasing in one piece. Cooling the pan all the way, then chilling the brownies until firm, gives the chocolate and butter time to set. The cutter can press through the slab cleanly, and the cutouts are less likely to bend when you lift them.
This matters again when the sticks go in. A firm brownie is easier to handle while you insert each stick and move the tree to the coating bowl. If the brownies are soft, the tips can crumble or the base can crack under pressure. The refrigerator time isn’t just a pause between baking and decorating; it gives these delicate tree shapes the structure they need to make it through the whole process. Use a firm, steady press with the cutter and lift each tree carefully from the surrounding brownie.
What Gives These Brownie Pops Their Fudgy Center and Smooth Green Shell
- Semisweet chocolate and cocoa powder — Chopped semisweet chocolate melts into the butter for a dense, rich base, while unsweetened cocoa deepens the chocolate flavor without adding sweetness. Use chocolate you enjoy eating; it’s a main flavor here. Keep the unsweetened cocoa rather than substituting a sweetened cocoa drink mix.
- Butter — Butter carries the melted chocolate through the batter and helps create the brownie’s tender, fudgy texture. Unsalted butter lets the fine salt stay in balance. Melt it with the chocolate rather than adding it cold.
- Eggs and granulated sugar — The eggs help hold the cutout brownies together, and sugar adds sweetness while contributing to their texture. Whisk in the eggs one at a time so the mixture becomes smooth before the dry ingredients go in.
- Flour and fine salt — All-purpose flour gives the slab enough structure to cut and hold on a stick; folding it in just until the dry streaks disappear keeps the brownie from getting tough. The salt sharpens the chocolate rather than making the brownies taste salty.
- Green candy melts and vegetable shortening — Candy melts make the colored outer shell, and the shortening helps loosen the coating so it’s fluid enough for dipping. Use a deep, microwave-safe bowl so each tree has room to dip. Chopped semisweet chocolate is not a direct replacement for candy melts because it won’t create the same green coating.
- Star and assorted holiday sprinkles — The yellow stars finish the top of each tree, while the assorted sprinkles add the scattered decoration. Keep them close at hand before you start dipping, since they need to go on while the coating is still wet.
From Brownie Batter to Trees with an Even Green Coat
Make a Smooth Chocolate Batter
Heat the oven to 350°F and line a 9×13-inch pan with parchment, leaving enough overhang to lift the brownies out later. Melt the butter and chopped semisweet chocolate together in a large microwave-safe bowl in 30-second bursts, stirring between each burst until smooth. Whisk in the sugar, then add the eggs one at a time and whisk in the vanilla. Fold in the flour, cocoa powder, and salt just until no dry streaks remain; stop there so the brownies stay tender.
Bake Until the Center Still Has Moist Crumbs
Spread the batter evenly in the prepared pan and bake for 22 to 27 minutes. A toothpick inserted near the center should come out with a few moist crumbs, not wet batter and not completely clean. A clean toothpick can mean the brownies have baked past the fudgy point, so start checking at the early end of the window. Let the brownies cool completely in the pan before chilling them for at least 2 hours.
Cut the Trees and Set the Sticks
Lift the chilled brownie slab out by the parchment overhang and set it on a cutting surface. Cut out 12 trees with a 2 1/2-inch tree-shaped cookie cutter, pressing straight down for defined edges. Arrange them on a parchment-lined baking sheet. Dip about 1/2 inch of each 6-inch paper stick into the green coating, insert it through the bottom of a tree about halfway, and chill the pops for 10 minutes.
Dip, Decorate, and Let the Coating Set
Microwave the candy melts and shortening in a deep microwave-safe bowl at 50% power in 30-second bursts, stirring between bursts until smooth. Let the coating stand for 3 minutes, stirring once; it should be warm but still fluid. Dip each tree, let excess coating drip back into the bowl, and place it flat on the lined baking sheet. Add one yellow star at the top and scatter the holiday sprinkles over each pop right away, then leave the coating to set at room temperature for 20 to 30 minutes.
Two Simple Ways to Change the Brownie Tree Format
Make them as flat brownie trees
Skip the sticks and set the chilled cutouts flat on the parchment-lined baking sheet before dipping and decorating. They’re easier to pack in a dessert tin, though you lose the hand-held pop format. Keep the star and assorted sprinkles for the same tree-like finish.
Leave a few trees chocolate-forward
For a less-sweet-looking finish, leave some of the cutout brownies uncoated and serve them beside the green pops. The plain trees keep the focus on the semisweet brownie, while the coated ones bring the candy-shell crunch and colorful decoration. Set aside any plain trees before arranging the dipped pops so they stay clean.
Storage and Reheating
- Refrigerator: Keep the set pops in an airtight container for up to 5 days. The brownie center will firm up when chilled.
- Freezer: Freeze the pops in a single layer until firm, then store them in an airtight container with parchment between layers for up to 1 month. Thaw them in the container to reduce condensation on the coating.
- Reheating: Don’t reheat decorated pops; heat can soften or melt the candy shell. Let refrigerated pops come to room temperature before serving.
Questions That Come Up When Making Brownie Pops
Christmas Tree Brownie Pops with Green Chocolate
Ingredients
Equipment
Method
- Preheat the oven to 350°F.
- Line a 9x13-inch baking pan with parchment paper, leaving enough overhang to lift out the brownies.
- In a large microwave-safe bowl, melt the butter and semisweet chocolate in 30-second bursts, stirring between each, until smooth.
- Whisk the sugar into the chocolate mixture.
- Whisk in the eggs one at a time and the vanilla until smooth.
- Fold in the flour, cocoa powder, and salt just until no dry streaks remain.
- Spread the batter evenly in the prepared pan.
- Bake for 22 to 27 minutes, until a toothpick inserted near the center comes out with a few moist crumbs.
- Cool the brownies completely in the pan, then refrigerate for at least 2 hours until firm.
- Lift the chilled brownies out of the pan and cut out 12 trees with a 2 1/2-inch tree-shaped cookie cutter.
- Place the trees on a parchment-lined baking sheet.
- Microwave the green candy melts and shortening in a deep microwave-safe bowl at 50% power in 30-second bursts, stirring between each, until smooth.
- Let the coating stand for 3 minutes, stirring once, until warm but still fluid.
- Dip about 1/2 inch of each stick into the coating.
- Insert each stick through the bottom of a brownie tree about halfway.
- Chill the trees for 10 minutes to set the sticks.
- Dip each tree into the coating, letting the excess drip back into the bowl.
- Place each coated tree flat on the lined baking sheet.
- Immediately place one star sprinkle at the top of each tree.
- Distribute the holiday sprinkles over the pops.
- Let the coating set at room temperature for 20 to 30 minutes before serving.