

Christmas Tree Meringue Cookies with Sprinkles
The meringue should look shiny and hold its shape before it ever goes near the oven. When it’s ready, a piped Christmas tree keeps its ridges instead of slumping into…
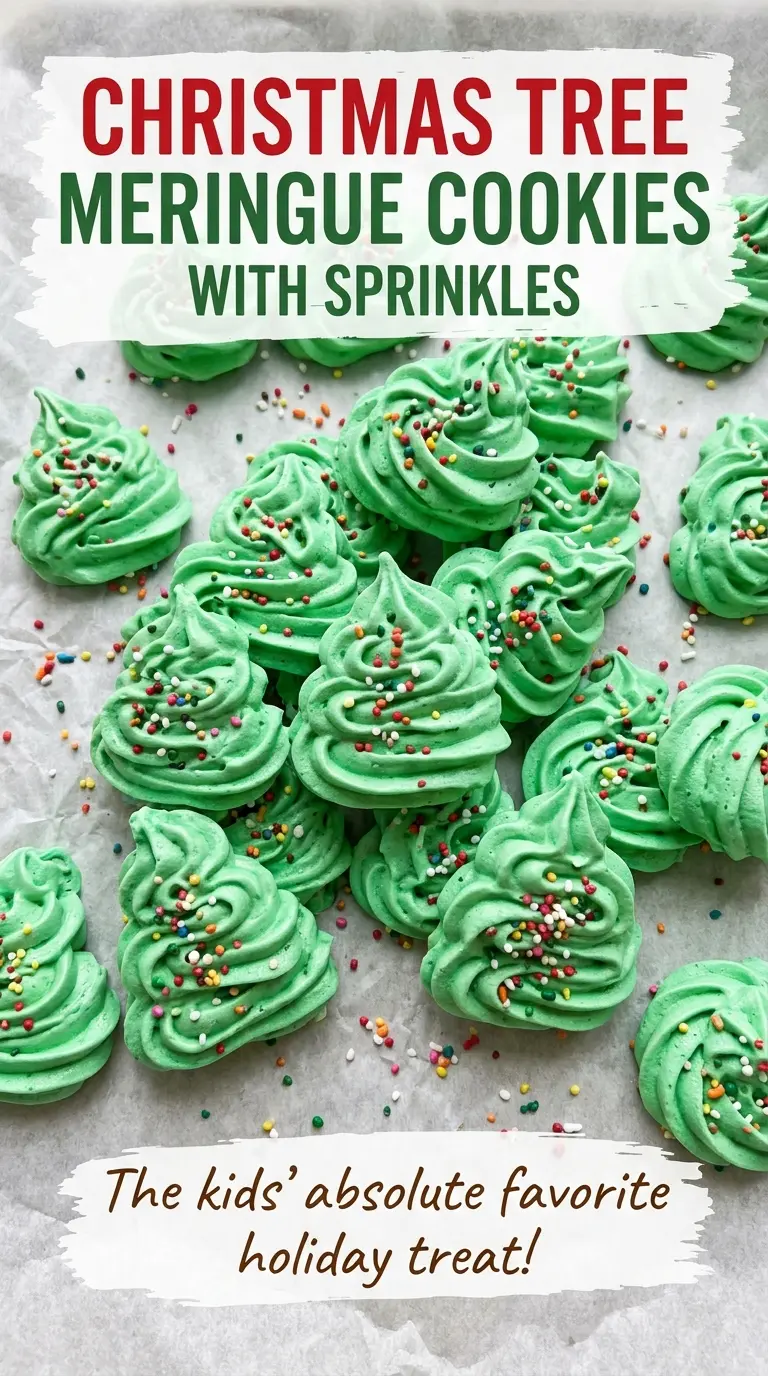
Tip: save now, cook later.The meringue should look shiny and hold its shape before it ever goes near the oven. When it’s ready, a piped Christmas tree keeps its ridges instead of slumping into a green puddle, and the jimmies cling to the surface without sinking. These Christmas Tree Meringue Cookies with Sprinkles make about 30 crisp, delicate little trees from a short ingredient list.
I use a gentle water bath to warm the egg whites and sugar together, then beat the mixture until it’s cool and holds stiff peaks. The low oven dries the cookies slowly rather than browning them, so they lift cleanly from the parchment when they’re ready. Give the meringue enough time at each stage, and you’ll have airy trees that snap when you bite into them.

Kitchen Note
Keep the mixing bowl above the simmering water, not in it. Direct contact can heat the whites too fast along the bottom of the bowl, while gentle steam gives you time to whisk the mixture evenly.
Save these Christmas Tree Meringue Cookies with Sprinkles for crisp green trees, glossy peaks, and a slow bake that helps each one dry all the way through.
Why the Sugar Has to Disappear Before You Whip the Egg Whites
These trees use a meringue that’s warmed before it’s beaten, rather than sugar sprinkled into egg whites while the mixer runs. That extra warming step matters because undissolved sugar can leave the finished foam gritty. Sugar that has dissolved into the whites gives you a smooth base that can whip into a glossy, stable meringue.
Keep whisking over the gently simmering water until the mixture reaches 160°F and the sugar has dissolved. The thermometer gives you a firm endpoint; don’t stop just because the bowl feels warm. Once the mixture is ready, beating it until cool and stiff creates the structure that holds the piped tree shape. If the meringue still looks loose or the peaks fold over, it isn’t ready for the piping bag yet.
This is also why I don’t rush from the water bath straight to piping. The mixer needs time to build a dense foam, and the finished meringue should look glossy rather than dull or grainy. Getting that foundation right makes the trees easier to pipe and helps them keep their definition in the oven.
What Each Ingredient Contributes to These Crisp Little Trees
- Egg whites — They create the foam that gives each cookie its airy structure. Room-temperature whites whip more readily than cold ones, so let them come to room temperature before starting. Separate carefully; even a little yolk can interfere with whipping. I stick with large shell eggs for predictable results.
- Granulated sugar — Sugar sweetens the meringue and helps give it its crisp, dry finish. It needs to dissolve fully during the warming stage, so ordinary granulated sugar works well when you give it time. Coarser crystals take longer to dissolve, and brown sugar changes the color and moisture of the mixture, so I don’t swap either in here.
- Cream of tartar — This small amount helps stabilize the egg-white foam as it’s beaten. Keep it in the mix for the most reliable stiff peaks; I don’t recommend leaving it out or replacing it with an untested acidic substitute.
- Vanilla extract — Vanilla rounds out the sweetness without taking over the light meringue. A good-quality extract comes through clearly, but a standard grocery-store bottle works just fine. I wouldn’t add extra, since liquid flavoring can affect the texture.
- Green gel food coloring — Gel coloring gives the trees a clear green shade without adding much liquid. Use gel rather than a watery coloring, and mix it in after the meringue has reached stiff peaks so you can stop as soon as the color is even.
- Jimmies — These long sprinkles add the festive finish and sit neatly on the piped ridges. A basic store-brand tub is fine; scatter them over each tree right after piping, while the surface is still tacky.
From Warm Egg Whites to Trees That Lift Cleanly
Warm the Whites and Dissolve the Sugar
Heat the oven to 200°F and line two 13×18-inch sheet pans with parchment paper. Whisk the egg whites, sugar, and cream of tartar in a heatproof mixing bowl set over a saucepan of gently simmering water. Whisk constantly for 3 to 5 minutes, until the mixture reaches 160°F and feels smooth rather than sandy. Keep the water at a gentle simmer, not a rolling boil.
Beat Until the Meringue Is Cool and Glossy
Remove the bowl from the saucepan and beat the mixture on high speed with an electric mixer for 8 to 12 minutes. Watch for stiff, glossy peaks, and keep going until the bowl and meringue feel cool to the touch. If the peaks droop, the foam needs more beating; soft meringue won’t hold the tree ridges. Beat in the vanilla and green gel coloring until the color looks even.
Pipe the Trees and Add the Jimmies
Fit a piping bag with a large open-star tip and fill it with the meringue. Pipe trees about 2 inches tall, spacing them about 1 inch apart on the prepared pans. Keep a steady hand as you pipe so the trees are similar in size and dry at the same rate. Add the jimmies as soon as each pan is piped, before the meringue surface dries.
Dry Slowly, Then Let the Oven Cool
Bake for 1 1/2 to 2 hours, switching the pans between racks and rotating them front to back halfway through. The meringues are ready when they feel dry and lift cleanly from the parchment; if they still cling, give them more time in the oven. Turn off the oven and leave the cookies inside with the door closed for 1 hour. Remove them afterward and cool completely.
Simple Ways to Change the Look Without Changing the Meringue
Make a snowy white tree
Leave out the green gel coloring and keep the rest of the ingredients and method the same. The finished trees stay white, with the jimmies providing the only color; the meringue doesn’t gain extra liquid from another coloring.
Leave off the sprinkles
Skip the jimmies for a clean, ridged finish that shows off the open-star piping. The cookies will have the same crisp meringue texture, just without the extra sweetness and crunch from the sprinkles.
Storage and Reheating
- Room temperature: Once completely cool, keep the cookies in an airtight container in a cool, dry place for up to 1 week. Humidity can soften their crisp shells.
- Refrigerator: Skip refrigeration; moisture in the fridge can make meringues sticky.
- Freezer: Freeze in an airtight rigid container with parchment between layers for up to 1 month. Let the closed container come to room temperature before opening, which helps keep condensation off the cookies.
- Reheating: These cookies don’t need reheating. Warming can brown them, and it won’t reliably bring back the original crisp texture once they’ve absorbed moisture.
Questions That Come Up While Making Meringue Trees
Christmas Tree Meringue Cookies with Sprinkles
Ingredients
Equipment
Method
- Heat the oven to 200°F.
- Line two 13x18-inch sheet pans with parchment paper.
- In a heatproof mixing bowl, whisk the egg whites, sugar, and cream of tartar.
- Set the bowl over a saucepan of gently simmering water, making sure the bowl does not touch the water, and whisk constantly until the mixture reaches 160°F and the sugar is dissolved, 3 to 5 minutes.
- Remove the bowl from the saucepan and beat with an electric mixer on high speed until the meringue is cool to the touch and holds stiff, glossy peaks, 8 to 12 minutes.
- Beat in the vanilla and green food coloring until evenly colored.
- Transfer the meringue to a piping bag fitted with a large open-star tip and pipe 2-inch-tall trees about 1 inch apart on the prepared pans.
- Sprinkle the trees with the jimmies.
- Bake for 1 1/2 to 2 hours, switching the pans between racks and rotating them front to back halfway through, until the meringues feel dry and lift cleanly from the parchment.
- Turn off the oven and leave the meringues inside with the door closed for 1 hour.
- Remove the meringues and cool completely.