

Mini Pecan Pie Cheesecake Bites with Vanilla Wafer Crust
When the mini muffin pan comes out of the oven, the centers of these little cheesecakes should still have a soft wobble, even though the edges look set. I used…
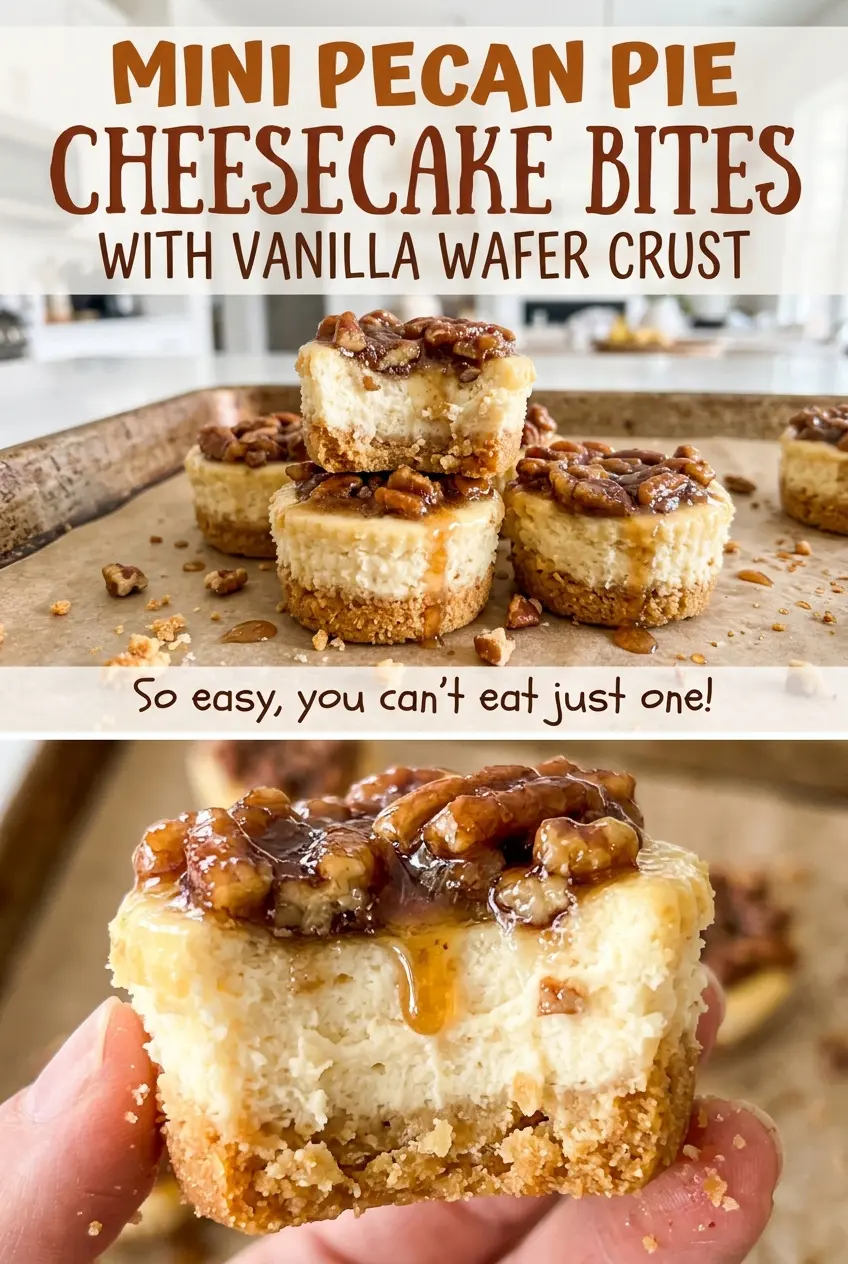
Tip: save now, cook later.When the mini muffin pan comes out of the oven, the centers of these little cheesecakes should still have a soft wobble, even though the edges look set. I used to wait for them to look completely firm, which left the bites denser than I wanted. Now I pull them at the right moment and let the refrigerator finish the job. Each one gets a buttery vanilla wafer base and a spoonful of pecan topping, so you get the pecan pie and cheesecake layers in a few bites.
The small size makes these easy to portion, but it also means the crust needs to be pressed firmly into each liner so it holds together when you pick up a bite. I keep the filling simple: cream cheese, sugar, sour cream, egg, and vanilla, mixed just until smooth. After chilling, the topping sets into a glossy, tender layer with finely chopped pecans in every bite.
Kitchen Note
Give the pecan topping its full five-minute rest off the heat before spooning it over the bites. It thickens as it stands, so it stays on top of the chilled cheesecake instead of running straight down the sides.
Save these mini pecan pie cheesecake bites for a dessert table when you want crisp vanilla wafer crust, cool cheesecake, and a glossy pecan finish in one bite.
Why These Cheesecake Centers Should Still Jiggle
Mini cheesecakes go from creamy to overbaked faster than a full-size cheesecake because each portion is small and has plenty of exposed edge. Waiting until the centers look firm in the oven is the wrong cue here. The edges should look set, while the centers still move slightly when you give the pan a gentle nudge. That little wobble isn’t a sign that the bites need more time; it’s how you keep the finished filling tender.
Cooling and chilling complete the set without another round of oven heat. The bites first cool in the pan on a rack, then spend at least two hours in the refrigerator until firm. That steady chill also gives the crust time to hold together beneath the filling. If you try to lift them while they’re warm, the filling is soft and the base is more likely to crumble; let the refrigerator do its work before adding the topping.
What the Wafer Crumbs, Sour Cream, and Corn Syrup Each Bring

- Vanilla wafers — Their mild vanilla flavor keeps the crust from competing with the pecan topping. Crush them finely so the melted butter coats the crumbs evenly; a few coarse pieces can leave the little bases loose. Finely crushed graham crackers work in the same volume if that’s what you have, though they give the crust a toastier, less vanilla-forward taste.
- Cream cheese — It gives the filling its body and familiar tang. Let it soften before beating so it turns smooth instead of leaving small lumps. Block-style cream cheese is a better choice than spreadable tub cream cheese, which has a softer consistency.
- Sour cream and egg — Sour cream lightens the rich cream cheese with a gentle tang, while the egg helps the filling set. Plain Greek yogurt can replace the sour cream in the same amount, with a slightly more pronounced tang. Bringing the egg to room temperature helps it blend into the softened cream cheese without leaving the mixture streaky.
- Vanilla extract — Vanilla rounds out both the creamy filling and the cookie crust. Use the extract you already keep for baking; there’s no need to save a specialty bottle for this recipe.
- Brown sugar, corn syrup, and pecans — Light brown sugar gives the topping its caramel-like flavor, and light corn syrup helps it cook into a smooth, spoonable layer. I wouldn’t swap in honey or maple syrup here; they change the flavor and won’t give the topping quite the same texture. Choose pecans that smell fresh and buttery, then chop them finely so they’re easy to spoon over the small bites.
Build the Bites in Four Stages, from Crust to Pecan Topping
Press and Prebake the Vanilla Wafer Bases
Heat the oven to 325°F and line the wells of a 24-cup mini muffin pan with mini paper liners. Stir the finely crushed vanilla wafers with 4 tablespoons of melted butter until all the crumbs look evenly moistened. Divide the mixture among the liners, using about 1 tablespoon per cup, and press it firmly into each bottom. Bake the crusts for 5 minutes, then set the pan aside while you mix the filling.
Mix the Filling Until Smooth, Not Streaky
Beat the softened cream cheese and granulated sugar in a large bowl until smooth. Add the sour cream, room-temperature egg, and vanilla, mixing just until everything is combined. Stop once no streaks remain; extended mixing after adding the egg isn’t needed. A smooth mixture now gives you an even filling in each liner.
Bake Gently, Then Chill Until Firm
Divide the filling among the liners, filling each about three-quarters full. Bake for 14–17 minutes, until the edges look set and the centers still jiggle slightly. Let the pan cool on a rack for 30 minutes, then refrigerate the bites in the pan for at least 2 hours, until firm. Don’t try to remove them while the centers are still warm and soft.
Cook the Topping Until It Bubbles Smoothly
Melt the remaining 2 tablespoons butter in a small saucepan over medium heat, then stir in the brown sugar, light corn syrup, heavy cream, and kosher salt. Keep stirring until the mixture is bubbling and smooth, about 2 minutes. Stir in the finely chopped pecans and cook for 1 minute, then take the pan off the heat and let the topping stand for 5 minutes. Spoon it over the chilled bites and refrigerate for 20 minutes, until the topping is set.
Easy Changes for the Crust, Topping, and Make-Ahead Plan
Make the Bites Gluten-Free
Use finely crushed gluten-free vanilla wafer cookies in place of the regular wafers, measuring the same volume. The crust will keep its vanilla-cookie character, though the exact crunch depends on the cookie brand you use.
Use Walnuts for a Different Nut Topping
Finely chopped walnuts can stand in for the pecans in the topping. They bring a slightly earthier, less buttery flavor but still pair well with the brown sugar and creamy filling.
Storage and Reheating
- Refrigerator: Keep the finished bites covered in the refrigerator for 3–4 days. The crust softens a little as it sits, but the chilled filling and topping hold their shape.
- Freezer: Freeze the chilled bites without topping in an airtight container for up to 1 month. Thaw them in the refrigerator, then make and add the topping before serving.
- Reheating: These are best served chilled, so skip the microwave; it softens the filling unevenly and can make the topping run.
Questions That Come Up When Making Mini Cheesecake Bites
Mini Pecan Pie Cheesecake Bites with Vanilla Wafer Crust
Ingredients
Equipment
Method
- Preheat the oven to 325°F.
- Line the wells of a 24-cup mini muffin pan with mini paper liners.
- Stir the crushed vanilla wafers with 4 tablespoons melted butter until evenly moistened.
- Divide the crumb mixture among the liners, about 1 tablespoon per cup.
- Press the crumbs firmly into the bottoms.
- Bake for 5 minutes, then set the pan aside while you make the filling.
- Beat the cream cheese and granulated sugar in a large bowl until smooth.
- Mix in the sour cream, egg, and vanilla just until combined.
- Divide the filling among the liners, filling each about three-quarters full.
- Bake for 14–17 minutes, until the edges are set and the centers still jiggle slightly.
- Cool the bites in the pan on a rack for 30 minutes.
- Refrigerate the bites in the pan for at least 2 hours, until firm.
- Melt the remaining 2 tablespoons butter in a small saucepan over medium heat.
- Stir in the brown sugar, corn syrup, heavy cream, and salt.
- Cook, stirring, until bubbling and smooth, about 2 minutes.
- Stir in the pecans and cook for 1 minute.
- Remove the topping from the heat and let stand for 5 minutes.
- Spoon the topping over the chilled bites.
- Refrigerate for 20 minutes, until the topping is set.